

In May and July, I have written about how the speedrun of Indiana Jones and the Infernal Machine for the GBC works. I wrote about the Any % route and the All Treasures route of the first level Canyonlands. Today, I want to take you on a journey to the second level Babylon. So far, we are following the levels of the N64 and PC version. But later in the game, we’ll have some differences. Anyways, before I get right into talking about the route, I want to mention that I’ll be talking certain terms and techniques that I have explained in the previous articles. If something is unclear, feel free to leave a comment in the comment section. Also, feel free to leave a comment in the comment section with your thoughts/opinions on this article! Anyways, let’s get right into it… Here I go explaining the route of the second level.
A small update
I have a few announcements to make. The first announcement is that two weeks after I published my write-up on the All Treasures route of Canyonlands, I decided to run the level again. With the possible time saves I have talked about in the article. And wouldn’t you know it, I have lowered the record from 4 minutes 41 seconds to 4 minutes and 36 seconds. Yup, I lowered the record by 5 seconds. I’m convinced that with a bit better movement and a bit more luck with RNG, the record might even go lower.
The second announcement is that all GBC categories are currently filled. What I mean by that is, that each category has at least one run. The only category that didn’t have a run was the full 100% run of the game. Where all treasures were picked up, almost all healing items (and sold) to play the full game including the secret level Return to Peru.
This run is stressful and not a lot of fun to do. Since, one or two mistakes in a level can cost you the whole level and in certain levels that can be a major time loss. In my run, I made a lot of mistakes, and I’m convinced it can get lowered, but that’s not for today. After trying for over three months, I finally got a run that I felt happy with, that made it to the end. And to my surprise, the end time was only ~25 minutes longer than my All Treasures run without Peru. The run took me 2 hours, 25 minutes and 56 seconds.
The final announcement is that I lowered a few other records. I lowered the time on Palawan Volcano and Infernal Machine. But, I’ll go more in detail about that when I get to the write-up of those levels.
With that said, here are the current stats of the second level.
Link to Speedrun.com page (All Treasures) – Link to Speedrun.com page (Any %)
The current world record at the time of writing is owned by:
for Any %: the_kovic who ran this level in 4 minutes and 19 seconds on January 29th 2022.
for All Treasures: me who ran this level in 6 minutes and 44 seconds on February 28th 2022. (Note, my ILS is part of my All Treasures – No Peru record. That’s why the video time is so different.)
Editorial note: when I haven’t given credit to screenshots, it’s taken from my runs.
ILS = Individual Level Speedrun. A speedrun of only one level.
Good to know: when I talk about a “two block gap” or “a tile”… the size of a tile is give or take half Indy’s sprite.
The route
You would think that the route is quite different in the two categories due to the almost 2 minutes and a half-time difference between the two. But, let me assure you, that’s not true. The route is almost the same but only some differences that add up some time on the clock. So, I’ll mention these “side paths” in cursive when the time comes. So, the cursive text is something additional for the All Treasures route. Text in cursive should be skipped and ignored when you go for the Any % route.
The first 30 seconds of the level is the exact same for both categories. As soon as the level starts, you’ll have to mash “A” to get the text box out of the way and move to the right.

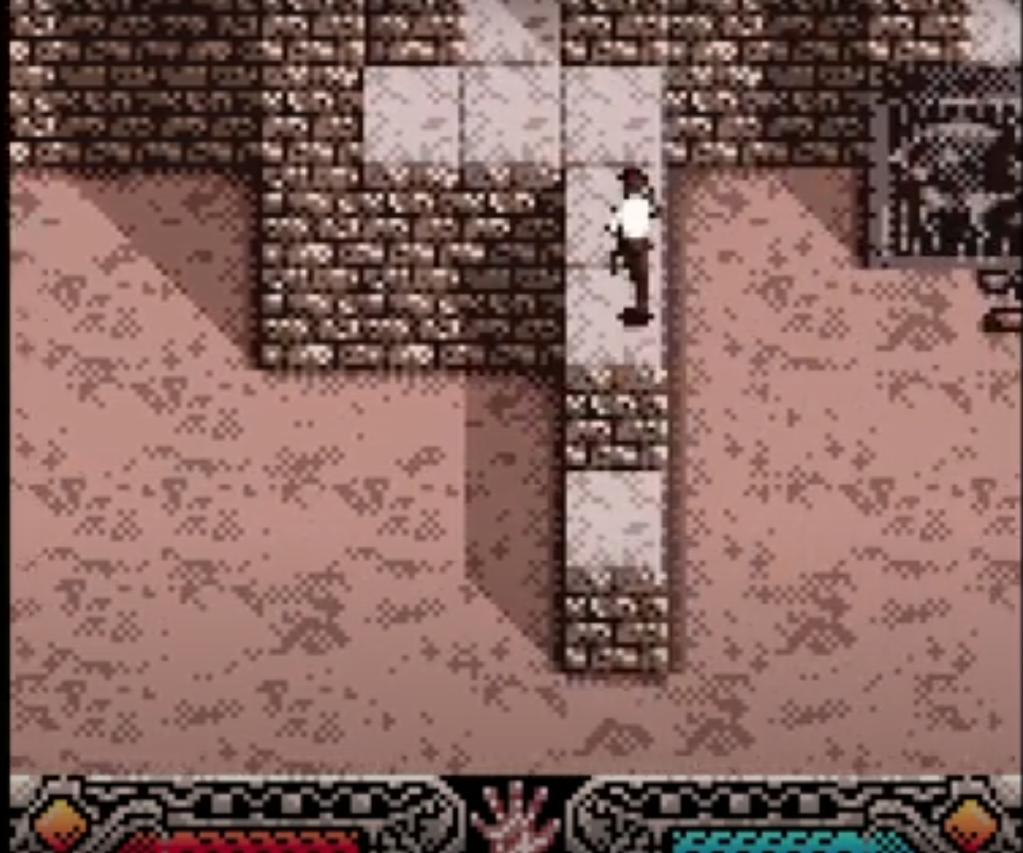
You’ll quickly reach a part of the structure where you can jump on. Jump on top of the lower brick and try to stay at the right edge of it while moving up. Here is a screenshot from the_Kovic’s run that has amazing positioning.
The reason that you have to be as close to the right edge as possible is that it saves a few frames on the jump to the right you’ll have to do when on the top.
Also, the_Kovic also discovered during making the TAS of the Any% of this game… That when you are on the edge of a block, the actual edge… You can make jumps further and higher than you expect. This’ll come in handy in the next screen. So, after the jump to the right, you’ll have to do some jumping up a “staircase” to exit the screen.
When you enter the next screen, it’s important that you land on the block that’s sticking out. The reason is that otherwise, you’ll lose a lot of health. Health that you’ll need later in the level.
Granted, there is a herb really close by but grabbing that herb in Any% is out of the way and makes you lose more time than landing on the block. If you are certain of your abilities, this block can be skipped when you go for the All Treasures route, but the time gain is as good as lost with picking up the herb. So, yeah. I usually try to avoid taking damage here.
Now, next is moving towards that movable brown block. In the current world record by the_Kovic, he actually lost time. Remember how I talked about the discovery he made during the creation of the TAS? Well, you can make two gap jumps and land one block higher when you jump from the edge of the block. It’s something you can see in action in my All Treasures run at the 6 minutes mark.
Sadly, this is quite a precise trick and being able to do it saves ~ 2 to 3 seconds. Yet, failing it… Well, let’s say it can cost you ~ 5 or even more seconds. Depending on if you move the block or not. This jump can be implemented in more spots, but it’s not too beginner-friendly. Since, the edge of the block almost looks like Indy isn’t touching the block anymore at all.
Anyway, after you made this jump you’ll have to jump on the building. Be careful when you jump since almost the whole back tile is blocked by a wall. So, don’t jump too early. When you land on the building, a small cutscene plays with a door opening. And here is where the first route difference happens. After the cutscene, you’ll have two options.
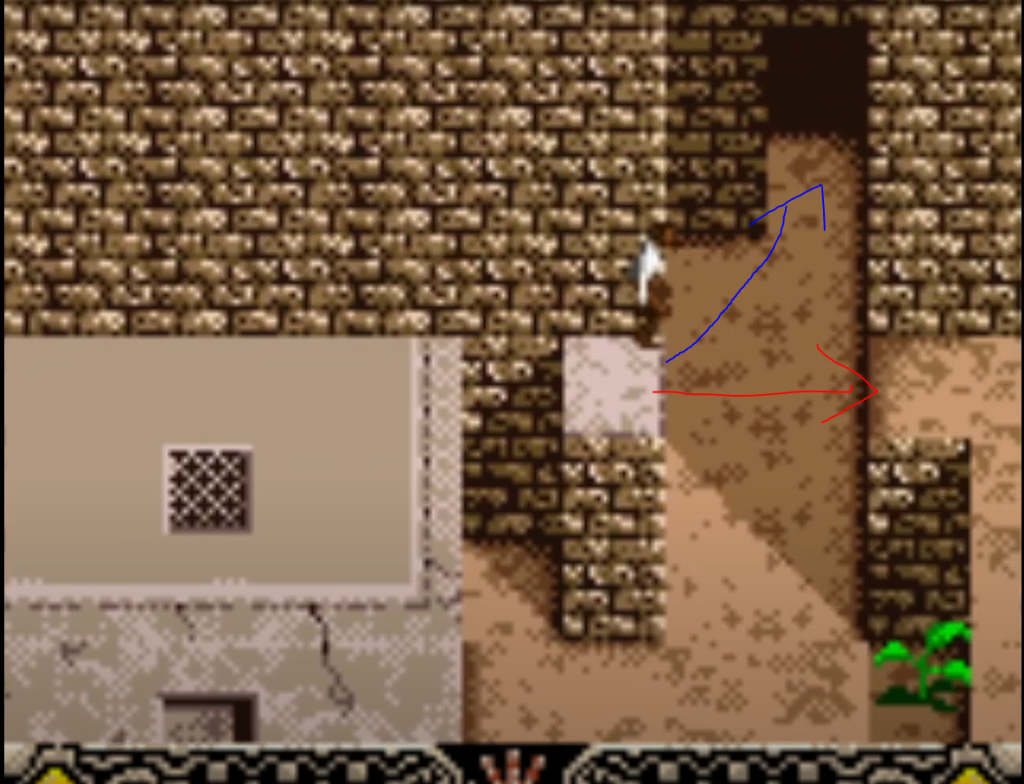
The blue arrow points to the all treasures route and the red arrow to the Any % route. Now, this door goes to a location where you only pick up one treasure and only has one entrance and exit. So, after picking up that treasure, you’ll have to jump on the building again and continue with the Any % route.
Now, let’s pick up our first treasure. To enter the door, you can either drop and run or jump from the block.
Jumping is a few frames difference since jumping is a tad bit faster compared to first having the dropping down animation. Anyhow, it can also be a mental thing… It feels faster to me. Now that we entered the room, we have to do something that I always call… Dancing with the guard. The treasure is in the top left corner of the room. In the top right, a guard spawns. This guard is annoying and can decide if you lose time or not.
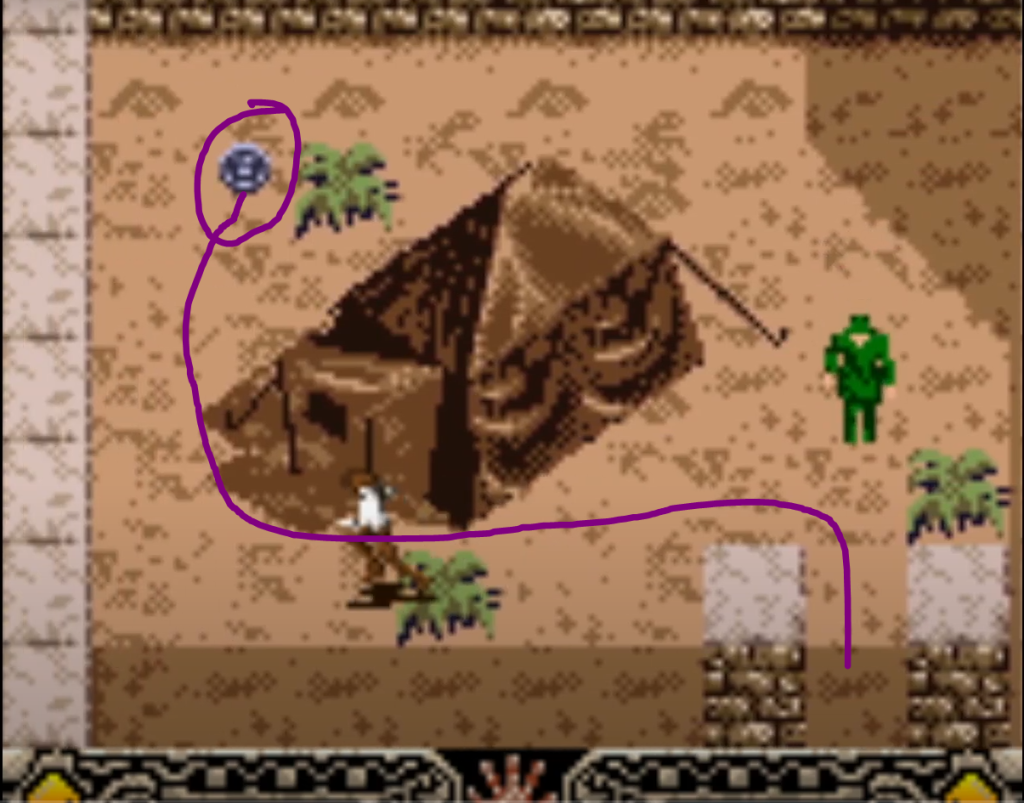
The fastest way to get the first treasure is going to the bottom of the tent and picking up the treasure, like the purple line shows. Now, the faster you do this, the less far down the guard goes. If the guard is at the position from the screenshot, you are safe to leave in the exact same way you came. Otherwise, you’ll have to go around via the top of the tent and lure the guard a bit away from the exit. Since, his hit box otherwise blocks the exit if you take the bottom route. Going via the top route looses a second but is safer. Also, if you lost too much health, don’t take the herb from the other screen… There will be a herb that’s a bit later you can grab that’s less of a time loss. Now, take the route with the red arrow before the cursive text began.

So, when you jumped over the gap and moved down to the next screen. Here, you’ll enter a room with two treasures and this room is a pain for the All Treasures %. But, for the Any %, you’ll have to just drop in the water… Or when you know the right spot, jump into the water to save a few frames.
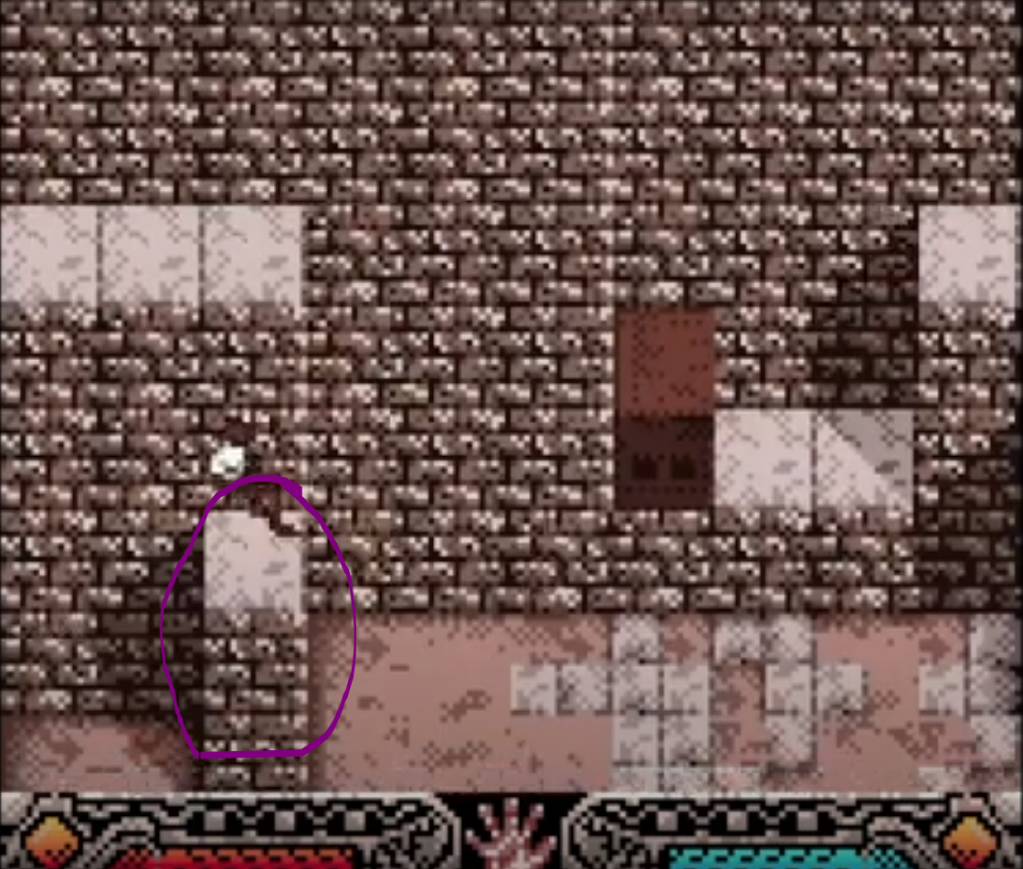
Now, picking up these treasures is a pain in the behind. It doesn’t matter to which way you jump first. But it matters from where. The safest is jumping from inside the purple squares. The best thing that can happen when you jump wrong is that you hit the wall. The worst thing that can happen when you jump wrong is that you drop into the water, and you’ll have to go around to get another chance. And that time loss, is way too high when you want to beat the ILS. This can only be a back-up strat in full game runs. In any case, after picking up the two gems, drop down in the water, so we follow the Any% route again.

After dropping into the water, you’ll have to swim up. Now, for the all treasures route of this level, you’ll have to make a small detour. The quickest way to exit the water for the Any% route is like the black arrow, hugging all the way to the left. For the All Treasures route, let’s go with the red arrow. You’ll enter the same room but for the all treasures route, swimming all the way to the right avoids one scorpion to pick up the treasure. Also, there is a herb in the middle of the path. Something good to know is that this herb also cures poison stings.
So, let’s pick up our fourth treasure. For this treasure, you’ll have to avoid some scorpions in narrow hallways. After exiting the water, go up right away until you hit the well and then go to the left. You’ll find a blue gem. Be careful with jumping to avoid the scorpions on your way back to the other side of the wall where you picked up the blue gem… Since, jumping too far means, back into the water with you.
When exiting the water following the black arrow, avoid the sting when going up and exit the screen via the left exit. When you are following the All Treasure route of this level, the room you enter in might look familiar. It’s on top of the room with the tent where the first treasure is picked up. When you missed picking up the second and/or third treasure… Those gems, you can drop down here to get another shot.
Depending on how good your lines are, you won’t loose too much health in this screen. Go around the bend and jump on the ladder when there is one tile between you and that will make Indy grab almost the top of the ladder. After climbing up, go left right away, with a bit of luck, the guard won’t shoot you. After that, go down when you can’t go left anymore. But don’t hug the right most edge of the pathway down since the screen transition to the next screen won’t happen.
In the next screen, go to the left and drop down in the section without the guard. To get to the next screen, run on the left most line of the sand. Walking on the tiles won’t transition you to the next screen. On the next screen, hug the left wall and when it bends to the left, go left as well all the while hugging the wall. Now, you’ll come into an open area.
Let’s go a bit to the right to pick up the treasure we saw when entering this screen. When you jump up the block via the right edge to reach the right edge of the platform… You’ll be able to grab the golden coins without the guard being alerted.
Now, go left a tiny bit to enter the door. You’ll enter a small room with a lever. Try to flip the lever as early as you can. This’ll open a bigger door to the left. Exit the room and go to the left to the newly opened door. Now, it’s time to dodge some guards. Also, don’t get distracted but this is one of the few rooms where you’ll notice some slowdown, it looks like this room isn’t optimized and in the long corridor, you’ll notice it… If you don’t hug the wall that is.

In this office space, there are three guards. Now, not taking damage here is almost impossible. So, dodge and weave boys. Go up, go left (don’t forget to pick up the treasure in the first office room, to the left) and go down. Go to the right. Now, in the one to last room, you’ll see a David Star with a hint to solve a block puzzle later. Since we are speedrunning, we shall ignore going into that room since the solution is easy and will be shown later in the article.
When you go up after the room, you’ll see the last guard. If you lost too much health, feel free to pick up the herb. If you have at least half your health, you are safe to continue. Shoot the two barrels so they explore and you can continue to the next screen.
The way forward is quite clear, it’s going down. This will make Indy drop down into a pool of water and now we get to the water maze. The biggest reason why there is such a big time difference between the Any % route and the All Treausures.

Now, allow me to me to use a diagram from the walkthrough by Jeff H. to explain the next parts. The red line is how the fast way in the underwater maze is. Always hug the walls, since that saves frames. Also, there is a small mistake in the diagram. The part before the last bend is a bit higher than shown on the diagram. Don’t waste too much time, since it’s a thight squeeze otherwise. When you go for the all treasures route, do pick up the first treasure in the first swim. After picking up treasure one, exit the water maze and let the breath meter fill before you go to pick up treasure two. This additional swim is one of the biggest reasons for the time difference. We have collected 8 treasures now. Be careful to not press A too soon to pick up the treasures, since Indy’ll swing his machette and this is a small timeloss.
After exiting the water maze, you’ll notice two pressure plates to the edges of the room. First go for the left one and then for the right one. This’ll activate an elevator down in a small cutscene. Then, from the right switch, go up to hit another pressure plate. Hit this switch three times by going on it and off it and on it again. The faster you do this, the more time you save. Then, press the pressure plate one of the left also three times for a small door opening cutscene. Enter that door.
Now, you will enter the room with the David Star where you saw the clue earlier. Move the right block to the most bottom spot on the star. Move the left block to the second spot if when counting anti-clockwise. A door should open. A visual aid:


We are almost at the end of this level. Let’s pick up some tablets. Now, remember this moment for a bit later in the article. Go to the left right away to find a small platform with a yellow L looking thing on it. This is one of the four tablets you’ll need to finish this level.
The red circle in the screenshot is where the tablet was. Now, the next jumps are a bit tricky if you aren’t too used to diagonal jumps in this game. Of course, in the all treasure route, we pick up the treasure. Doing this jump to the ladder saves some climbing time. And like I explained in the Canyonlands write-up, climbing in this game is extremely slow.
When you reach the top of this ladder, you’ll see another L-tablet. Of course, pick that up. Then use your whip to reach the platform to the right. On that platform, pick up the tablet and use your whip to go to the right again to go pick up the final clay tablet.
Now, on the last platform, there is an extremely tricky ladder snipe you can do. The ladder at the bottom is extremely close and it’s extremely easy to over or undershoot it. Feel free to try it since it save a few seconds, but missing the snipe means game over. I usually play it safe and jump across the gap on the right to slide down. This is one of the main reasons why I said you’ll need some health, since if you keep pressing down to go faster on this slide down, you’ll take a considerable amount of damage.
The next step is exiting the room. Now, remember that moment when I said to remember that moment? Well, if you know this room well and practice it… You’ll be able to finish this room in 45 – 50 seconds. The most annoying bit is the whip part since if you aren’t at the right spot, Indy swings his whip in the air and this is the biggest possible time loss in this room. Also, don’t forget that the SELECT button swaps faster between your inventory than actually going in it. The clay tablets don’t appear while using SELECT.
So, now you will need to head to the elevator you activated earlier. Activate the elevator by pressing A whilst having the hand icon at the bottom. This room is the final room of the level. Don’t forget to pick up the final treasure. Since, you won’t be able to pick it up as soon as you place the final tablet! I usually pick it up before doing anything else in this room.

You’ll see a cog and something that looks like a button/switch. Go stand right in front of it, facing it. Open your inventory and select the cog item. This will open the location where you need to place your four tablets you picked up.
Now, when you face the tablet placing spot… Keep calm whilst navigating the inventory. Know that the cursor goes a bit slower then when you press or hold it. The amount of time I lost by doing horrible inventory navigation, it isn’t funny anymore. After placing the 4th and final tablet, a map will be revealed and the end of the level jingle will play.
Wrapping up
This is one of the levels I rarely have trouble with. While I did make some silly movement mistakes in my All Treasures ILS, I did have the route down. I think I can shave off at least 5 to 10 seconds with a lot better movement.
Also, the current Any % world record can be beaten when the at the start, the block isn’t pulled to get on the building and the ladder snipe at the end is implemented. It would bring the record a down by a few seconds. But, you’ll need to play the level close to perfect to beat it. I tried it once and I thought I got it, but due to a bad jump, a bad lever flip to open the office area and no ladder snipe, I lost too much time.
Both records are close to fully optimized. Like I said earlier, my All Treasures has some bad movement and the_Kovic’s Any% doens’t have all tricks implemented. But, you’ll need to practice to be able to beat the times. Unless, there is something I’m overlooking or a new strategy is found or route optimization.
The biggest thing of this level is that it’s a longer level to run sandwiched between three shorter levels. Especially for the Any% runs. I mean, Canyonlands is beaten in a few seconds, and the two next levels can be beaten in give or take 2 minutes. Actually, think about it, the comment doesn’t really count if you go for the All Treasures route.
Anyways, that was the write-up for Babylon. It would be a bit silly to create two parts for this level since almost all treasures are on the Any% route or a bit besides it. But, it made for an amasuing article to write and I hope to read as well. I hope to be able to welcome you in another article but until then, have a great rest of your day and take care.

One thought on “Speedrunning Indiana Jones and the Infernal Machine GBC – Level 2 – Babylon”