

While my focus has shifted away a bit from speedrunning, I still sometimes try to beat the records for the Game Boy Color version of Indiana Jones and the Infernal Machine. Now, since we got a new game announced, called Indiana Jones and the Great Circle… I honestly think it’s a great moment to continue that series on my blog, where I explain the starts and fastest ways according to me to beat the game. I want to say as a disclaimer that I’m talking about the current level speedrun records. The_Kovic made an awesome TAS of this game, I mainly want to talk about the current human speedrun. So, let’s dive right into it. Feel free to leave your questions, comments and/or thoughts on this article in the comment section down below.
Current records
One term I’ll explain is something I talked about in the introduction, I talked about “TAS of this game”. TAS stands for Tool Assisted Speedrun. This means that it’s created using tools like save states, slowdown amongst various others. Also, in these runs we can control the input to the frame. Basically, this means that we get a look if the run is perfected.
Now, comparing the route of the TAS through the game and the route of the current record, we basically don’t see a lot of differences. The biggest difference is that the movement is a lot cleaner and a lot of extremely risky jumps and tricks are preformed. From watching the video, the current TAS is, give or take 7 minutes 5 seconds.
Currently, the record for Shambala is 7 minutes 51 seconds, set by myself on December 10th 2023. I know it can go lower since I have already done it. But, due to me messing up my OBS settings, the video is anything but watchable. I decided to not upload the video, but I know it’s possible. Currently, my personal best is 7 minutes 40 seconds. I’ll explain how to save time in this article, since I even think it’s humanly possible to go even below that by a tiny bit.
On January 22nd, 2022 I also set the current record for all treasures in this level. The current record is 8 minutes and 57 seconds. Now, this run doesn’t use all the most optimal jumps and tricks. This is something that can go lower. In the guide, everything that’s in cursive is additional information for the all treasures route.
The route
The level starts with a little dialogue box that Indy needs to hurry up because the Soviets aren’t too far behind. In the PC version, the Soviets only turn up after you pick up a certain key. In the Game Boy Color version, they are already there. If you want to run this level, I highly advise you to learn where the 5 guards are in this level.

I had several runs where I lost time due to bad guard movement RNG. The first guard is when you move up. Just run past this guard to go to the next screen. Yet, if you are doing all treasures, the first treasure is to the left here. So, pick that up first. Usually, I pick up that red gem while at the right most edge of the texture and already turned to the right to run back to run up.

Keep running up towards the building, which is actually Shambala. It doesn’t really matter where Indy stands to open the door, since the game forces you in the middle of the entrance when you enter it. When you enter, you’ll notice a block to the left. Don’t make the same mistake I quite often make. It’s faster to go to the right block and move that one to the side first. So, move the block to the side and press the button that gets revealed. Do it for the right and left side, in that order.
After that, move upwards on the left side of this room towards two doors. Something I do that’s different to the TAS is I press the third button before I enter the next room. The TAS presses the button when we exit from the other room. Personally, I think it doesn’t make a lot of difference timewise, maybe 2-3 seconds. The reason I directly go for the switch is that I don’t want to forget to press it. The guard is usually now facing away from Indy and walking towards the other door. The TAS route is riskier, since there is a high chance that the guard is facing towards you when exiting the other room and can get a few shots off. And those can be quite dangerous, since the TAS even finishes this level with one health point left. Anyway, for the next room, you need to take the left door.
Now, the next room has three parts to it. It also has three bricks to move, well, depending on the route you are taking. But be careful here. There are two guards roaming around in this room. RNG can really screw you over here depending on how these guards move. Now, if you take the all treasures route, you have three bricks to move. The one for the treasure is at the far left in this room. If you are confident in your jumping, it’s possible to stand on the left most edge of this block and jump up towards the green gem. If you aren’t, move it once right and then jump up towards the green gem.

Now, we take the middle section. This is a little bit to the right when you enter from the left door. You’ll see two gears moving on the wall. Move the block over once to the left. If you stand on the right most edge and face right, you’ll be able to land on the higher platform with the gear. Feel free to move it closer if you don’t feel comfortable with those edge jumps.
After you picked up the gear, move towards the right most section. Now, we do the same block pulling thing here as well. If you can, try to jump up towards the ladder. The less climbing you do, the more time you save. Climbing is really slow in this game. When you reach the top of the ladder, we see the first Ice Monster of this level. Usually, moving to the top row of tiles and jumping over it towards the door avoids damage.

Now, in the following room, we have a hallway and two higher sections. Go towards the section on the right and move the block on the top left of the platform once down and once to the left. Here I lost 4 seconds in my record because of some horrible movement. The following trick might be in my head since the TAS doesn’t do it, but I usually do it. The reason why is that it’s the most consistent way I have to make 100% the cutscene of opening the room on the left triggers without you having to move another block. And that’s not pulling the top block towards the other square but pushing it. Don’t forget that on the top right of this section there is a gold bar treasure, after pushing the block is the perfect moment to go grab it. After you push over that block, go to the bottom right of this section and pull the block towards the bottom square. The reason you need to pull is that it saves time to not have to go around the block after the cutscene. Also, practice the jump of landing in the middle of the hallway or beyond that. You’ll need that later. Now, move to the newly opened section and move towards the other top corner. There you’ll need to pick up a rod. And, if you jump a bit higher, on the next tile a set of coins. After that, leave the building. Be careful to dodge the guards and the ice enemy on your way back. If you feel extremely risky, you can save time by jumping towards the ladder in the ice enemy room to save time, but if you don’t grab the bottom pixels of the ladder it’s game over.
Now outside… we move to the right of the building. Now, the fastest way to arrange the boxes is moving the two stack once to the right and the one stack once towards the left. Doing this jump without loosing time is extremely tricky but would save a lot of time over pulling the blocks into the easiest configuration. It’s a lot of edge jumps here, but I have done it and it’s possible. So, jump up and towards the platform to pick up the blue gem. After that…
… we go left of the building. Here I lose 2-3 seconds of time in my record because of some bad movement and not grabbing the two stack box right away. The easiest and fastest way to progress is pulling the two stack box one towards the top of the screen. After that, jump on the one stack and diagonal to the right to enter the next room. After entering the room, pick up the treasure at the left. Do it now, otherwise the guard RNG will be hell. Now, we need to go in the door next to the climbable wall.
From now on, the easy part of the run is over. Now come a bunch of sections that can potentially make you lose a lot of time or just end your run outright. There is a treasure at the bottom right of this room. Pick it up first. Now, jump over the gap and move towards the broken tile at the top right of the room at the gears. While facing the gears, open your inventory and pick the ratchet. You’ll need to move to the left 4 times in your inventory and press A. This is meant to block the bell from falling back down.
Now comes one of the first sections that can cost you a lot of time. I highly advise you to practice this next section. Just take a look at the stream Klamath and I did. The idea is that you jump back and forth between the two broken tiles. The timing is extremely strict. You’ll hear a sound effect when you hit the tile in time. When you hit the tile and don’t hear the sound effect, the bell is going to fall down and you have to start over. So, try and try this bit until you are good at it. After 7, yes 7, jumps back and forth, the bell reached the correct point. Now, the camera will pull up to show the location of the bell. Whilst it’s moving down, move towards the door at the bottom left of the room. It’s possible to exit the room before the camera reaching the bottom. Since I missed this once during my record, I lost 12 seconds.

After exiting the room, a guard suddenly shows up. The fewer hits this guard does on you, the better. Yet, the space is quite tight and it’s difficult to avoid him. Now, we need to climb up the wall. Jump towards the climbable wall that’s closest towards the door we just entered the room from and climb up. Now, we do something that’s unique to the Game Boy Color. Whilst climbing up, you will have to drop towards another ladder. For the first drop, it’s fine if you move over to the left. For the second drop, climb towards the top and let yourself drop towards the right and hold up. It’s scary to do, but hold up during the fall. Otherwise it’s game over for sure. After you climbed up, go to the left and exit this room at the top left door.

Now comes to the next trick, depending on how well you execute it, you’ll save more time. The idea is that, when you enter the room… you move towards the right edge of the room. Run down and jump down give or take a tile before the edge. Let yourself fall but hold up at the right time. The idea is that we grab the long ladder a bit down there. Failing this trick is a run ender. It’s no short ladder so be careful of dropping off this ladder. Now, after you are off the ladder, move to the bottom left of this room and climb down. Or be even more risky after this ladder snipe and snipe the ladder at the bottom left like the TAS.

Now, in the next room, don’t climb the ladder down. Midway the ladder, drop down towards the gears. You’ll notice that there is a peg sticking out of the wall. Stand in front of that one and open your inventory to go trice to the right to select the gear. Now, stay on the raised platform and move towards the other side of the room. Drop down to take the silver bar and jump up towards the raised platform. Those ice guardians are quite painful and hurt a lot. The more damage you take, the higher the risk you’ll loose your run. Now, jump towards the ladder from a little bit before the last tile to save the most climbing time.
Now, the clock starts moving. Move as quick as you can towards the button and here comes something I’m still unsure about the fastest way to go forward is. I know you can totally skip the cutscene of the camera moving up to show the statue turning like the_Kovic does in the TAS. Yet, in order to do this, you’ll need to preform some tricky jumps perfectly. It does save a lot of time, yet almost five minutes into an any % run and after preforming various edge corner jumps, that annoying bell part… I find the TAS strategy at the moment of writing too risky. I linked to the TAS a bit higher if you want to see how the TAS does it, but I’ll explain how I do it. It costs 10-15 seconds, but it’s a way safer strategy in my honest opinion. Sadly, using the glitch that Indy can move after the button press for a little while isn’t possible, so that costs us an additional second.
So, press the button twice and watch the cutscene of the camera moving up to show the statue moving. While the camera is moving down, we regain control of Indy. Depending on how confident you are with your jumps and your nerves at this point… Press the button between 7 to 9 times. I personally prefer 9 times. It gives you some room for error. The red brick-thing will be either at 9, 10 or 11.

Now, comes the annoying part. We need to go back up. Go towards the raised platform you notice at the middle top of your screen and jump up and enter the door. You’ll notice we exit at the platform at the bottom of the ladder we sniped earlier. Climb up to the top of it. Now, if you want to be extremely risky, you can do what’s known as a corner jump.
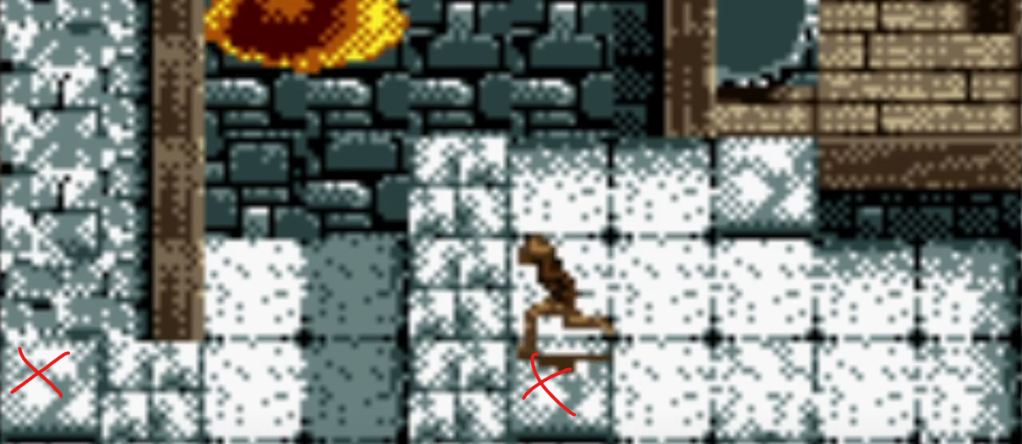
It’s an extremely risky jump that can save you a lot of time and is essential when you pressed the button at the bottom 6 or 7 times. The idea is that you jump from where the X is after you climbed up the ladder and hold left up in the air to land where the other x is. Now, missing this jump means a game over. So, you risk it all here. I was around 5 minutes 18 seconds in my record run and as you can see from the screenshot, I walked into the door after the ladder. Now, we need to do a corner jump to the raised platform at the left here. It’s quite the precise jump so that’s why I was only able to do it after my third attempt in my run. Enter the door and jump towards the ladder after exiting the door. Be careful to not miss that ladder, since if you don’t land on that raised platform, it’s an instant game over.
Now, after climbing up that ladder, go towards the button at the top right of this room. As soon as the statue starts spinning, press it. You’ll watch a lengthy cutscene of the statue going on the rails towards the bell. You will see something drop down from the bell and see the door you entered this room from close. This will take +/- 30 seconds.
Let me also tell you, if you don’t have a spinning statue in a few seconds, you best reset your run. Since now the clock needs to reach the red peg and that’s too big of a time waste.
But we are in the final strech of the level. Now, don’t loose focus in these 30 seconds since we are not done quite yet. Run towards the left and jump towards the ladder to save up on some climbing time.

When you reach the top of the ladder, and grab the 9th treasure at the top left of this room, we need to dance around the ice guardian to reach the climbable wall that’s just outside of the shadow part of this section. Now, when you enter the next screen, drop down at the right from the climbable wall.
Now comes the final life or die trick of this run. We need to drop down somewhere along the purple titles. The best way is where I have drawn a red line. Hold up to grab the climbable wall, but not too soon to not grab it at the top. Since climbing is slow in this game and there is still that pesky guard at the bottom. The idea is to grab the climbable wall as low as possible so you can drop down without loosing too much health and not loose too much health to the guard having some free shots at you. You’ll need to face that guard twice, since you need to enter that annoying jumping room to pick up the seed that dropped down. Now, you can save a little bit of time since the hitbox of the seed is bigger then you think. If you stand on the edge of the tile, you can pick it up.
Exit the room and make your way to the building. If you have health enough, drop down from the ledge outside. Once inside the building, move towards the blue flower tile and standing in front of the water… open your inventory and move three times to the right to pick the seed. Now, it’ll turn into a flower. Now, go up towards the right side of the room to enter the right door. After that, go to the right section and climb up the ladder. Here some luck will be involved to avoid the guard. When you climbed up the ladder, dodge the ice guardian again and now you have the run in the bag. If you don’t make stupid movement mistakes… you’ll be able to finish the run in just a few seconds.

Now, move down the hallway we all know to well into the final room. Pick up the final treasure at the bottom right of this room before you do the final “puzzle”. Now, when you stand in front of the fire… stand as close to the middle as possible. I have lost so much time when standing on the edges, it’s insane. In my record run, I lost close to 10 seconds because of this. Now, while facing the fire, open your inventory and move 3x to the right to select the flower. This will open the chest. Move towards the chest and face up and open it. After that, Indy will say that he found Urgon’s Part and the level ends.
Conclusion
Shambala is quite the insane run and after the first four shorter levels, this level is the first of a set of three quite lengthy levels with a lot of tricky jumps and avoiding enemies. Now, currently the world record is 7 minutes and 51 seconds. I have pointed out where I lost time in this article and if you count that all together, you have roughly 30 seconds.
I honestly think that 7 minutes 30 seconds is humanly possible for this level. Maybe even 7 minutes 20. But, that means there is barely any room for error and you need to take a lot of risks and be very lucky with the guards movements.
Usually, when I’m doing attempts for a new full game any % run, I usually know after Shambala if this is going to be a good or bad attempt. Another level is the Volcano, but the reason why I call it my run killer will be explained when I talk about that level.
Currently, when I’m doing speedrun pratice, I’m trying to perfect Shambala. I want a clean recording of my personal best and I want to see how much lower I can take that all treasures record. Now, my first record for the any % of this level was 8 minutes 55 seconds and for all treasures it was 9 minutes 46 seconds. I have saved a minute for each category for this level, and I can go lower. So, keep your eye out on the leaderboards, since as soon as I preform a run that beats my current record run, I’ll post it.
And with that said, I have said everything about this level for now. If you have any questions about this guide, feel free to ask them in the comments. Also, I wish everybody a happy new year, since this is the first article I’m going to publish in 2024. I also want to thank you for reading this article and I hope you enjoyed reading it as much as I enjoyed writing it. I hope to be able to weclome you in the next article and until then have a great rest of your day and take care.
